Create a Stunning Lightbox-Style Random-Post Header Gallery

In this tutorial, we’re going to take advantage of two of WordPress’ most powerful features, get_posts() and custom fields, to create a stunning random lightbox-style header gallery for your post images.
Displayed before the standard post loop, this lightbox gallery will randomly display the images that are associated with your posts while also providing a descriptive title link to the post itself. Here is a graphical representation that will help us visualize the concept:
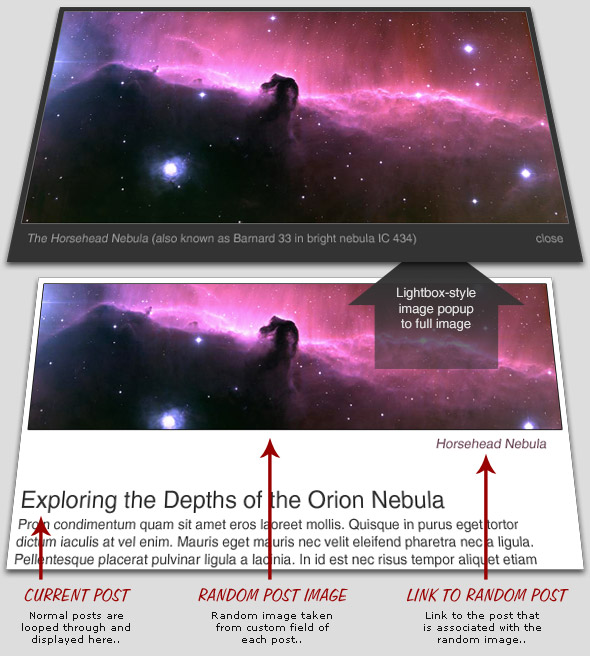 Random post-display functionality with lightbox-style popup image and title post link
The key to setting this up involves creating a set of custom fields for each post and then displaying the information randomly before the main post loop. Let’s begin with the custom fields.
Setting up the custom fields
If you have already been taking advantage of WordPress custom fields, then you already understand the basic idea here. For each post that you would like to have appear randomly in the header of your theme, create the following set of custom fields:
 Custom-field data associated with each randomly displayed post
Notice that we are using relative file paths for the images. This trick ensures maximum flexibility and portability for our custom-field data. Also note the two different images we are using for each post: a full-size image that will be displayed in the lightbox popup, and a cropped or resized version of that same image for display in the random header.
Once you have associated these custom fields with a few of your posts, it is time for a little get_posts() action to display the random content on the front-end of your currently active theme.
Editing your WordPress theme files
One of the great things about WordPress custom fields is that they enable you to display your content in just about any way imaginable. In this tutorial, we are going to display our custom-field data in the header area for every page on the site. Thus, we open our theme’s header.php file and add the following code:
<?php $random = get_posts('showposts=1&orderby=rand'); foreach($random as $post) : setup_postdata($post); ?>

<p>
	<a href="http://domain.tld<?php echo get_post_meta($post->ID, 'randomImage', true); ?>" title="<?php echo get_post_meta($post->ID, 'randomCaption', true); ?>" class="thickbox">
		<img src="http://domain.tld<?php echo get_post_meta($post->ID, 'randomBanner', true); ?>" alt="" />
	</a>
	<small><a href="http://domain.tld<?php echo get_post_meta($post->ID, 'randomLink', true); ?>"><?php echo get_post_meta($post->ID, 'randomTitle', true); ?></a></small>
</p>

<?php endforeach; ?>
As mentioned, this code goes before the normal WordPress loop and calls data from each of the five custom fields that have been added to your posts. Instead of using the more powerful query_posts() for this random post display, we use the simpler get_posts() function instead. It does everything we need while eliminating unnecessary variables and potential complications.
A few other points of interest for this WordPress snippet; notice we are setting the randomness and limiting the post display to one ( 1 ) via two parameters in the get_posts() function. Once the query has been setup, we are using the get_post_meta() tag to populate the following markup with their respective custom-field values:
<p>
	<a href="[randomImage]" title="[randomCaption]" class="thickbox">
		<img src="[randomBanner]" alt="" />
	</a>
	<small><a href="[randomLink]">[randomTitle]</a></small>
<p>
This demonstrates the incredible design flexibility enabled by WordPress custom fields. Once this code is in place, it is time to wrap things up by implementing the JavaScript-powered lightbox functionality.
Adding the JavaScript
To finish things off, let’s make that random-banner image really “pop” by implementing some JavaScript-powered lightbox functionality. As you probably know, there are many lightbox clones from which to choose, but for this tutorial we turn to Cody Lindley’s excellent Thickbox script.
ThickBox is a webpage UI dialog widget written in JavaScript on top of the jQuery library. Its function is to show a single image, multiple images, inline content, iframed content, or content served through AJAX in a hybrid modal.
Using Thickbox is so easy, it almost feels like I’m just being lazy for using it. In fact, we have already setup our WordPress code for use with Thickbox by simply adding the class="thickbox" attribute to the random-banner anchor element. The only other thing that really needs to be done is to upload the Thickbox script and accompanying CSS file to your server and link to them from the <head> section of your header.php file:
<link rel="stylesheet" href="http://domain.tld/wp-content/css/thickbox.css" type="text/css" media="screen" />
<script type="text/javascript" src="http://domain.tld/wp-content/javascript/thickbox-compressed.js"></script>
Once everything is in place, your random-post gallery should be working great!
About the author
Jeff Starr is a professional web developer and book author with over 15 years of experience. Jeff works with WordPress every day, designing themes, developing plugins, and securing sites. His books include Digging Into WordPress, WordPress Themes In Depth, and The Tao of WordPress.


11 responses
-
 Bullardino
Nice one, i’m digging it to keep it
-
 Jeff Starr Post Author
Awesome – thanks! :)
-
-
nice stuff. thanks!!
-
Jeff Starr Post Author
My pleasure! :)
-
-
 Benjie
Do you have a future post here someday that will teach on how to change lay out on WordPress. Just like what Chris did on his video making wordpress theme from scratch. Its good but some of the videos have him shortcut the codes. I really want to know how to put some things on the lay out just like he did when he put the search box on the header and like he put the link on the right side of the top navigation…. Stuff like that would be good here. Since you put tutorials and tips here, why not put one like that here.
-
Jeff Starr Post Author
Thanks for the ideas — we will definitely be sharing all sorts of juicy WordPress tips and tricks, including lots of stuff about how to do cool things with layouts, navigation, and much more.
-
-
 Brandon C.
Jeff, i have been trying to do something similar to this
but with Flash. I want to display my slide shows and videos that i have done on the front page as a header. Do the same principles apply?-
Jeff Starr Post Author
Basically, yes. But there are additional factors that you will need to account for when dealing with Flash, such as finding a lightbox script that plays the content you need, and also formatting the movie to fit your header area. All of the WordPress custom-field functionality should work the same.
-
-
 Thomas Offinga
Great tutorial Jeff, I think I might implement my flikr photostream on my portfolio site using this trick! Thanks.
-
Jeff Starr Post Author
Cool idea Thomas – let us know if you do it, would love to check it out. Cheers.
-
-
Excellent tutorial to create a great gallery. I will definately try this in my incoming projects