What to do when WordPress Auto-Update Fails
Ahh yeah, WordPress just rolled out another update to version 3.1.1. If you’re able to upgrade via the Admin, updating your site(s) should be a piece of cake: just log in, click a few buttons, wait a few minutes, and done. The convenience of automatically updating the WordPress core, plugins, and themes is awesome, but things can go wrong once in awhile and auto-updates can fail.
If this happens, getting back on track is a bit tricky, so here’s a quick guide to help restore site functionality and ensure a proper WordPress update.
Update: Fix newer versions of WordPress
This is an update to the original tutorial below. For newer versions of WordPress, when you try to upgrade WordPress, you might get an error that says:
Another update is currently in progress.
If you get that message, follow these steps:
- Delete the option named
core_updater.lockfrom theoptionstable in your site’s WordPress database - Delete the contents of the upgrade directory located at
/wp-content/upgrade/(delete anything inside of this folder)
The first step may be all that’s needed to fix the error. The second step is just to be 100% sure that you’re stopping the current/stuck upgrade and want to start fresh from scratch.
We now return to the original tutorial..
What an auto-update failure looks like
After initiating the auto-update of the WordPress core (say, from 3.1.0 to 3.1.1), the “Update WordPress” screen will begin displaying the status of each step, beginning with these messages:
- Downloading update from
http://wordpress.org/wordpress-3.1.1.zip… - Unpacking the update…
- Verifying the unpacked files…
- Installing the latest version…
So far so good, but even if it gets that far, there’s still a chance of failure, as seen in this recent screenshot:
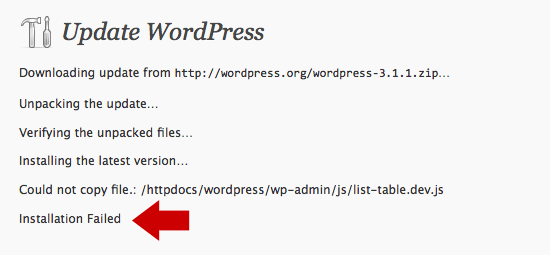
The status message that appears just before “Installation Failed” explains what WordPress thinks is the issue, but there are cases where things go wrong and no messages are displayed. In either case, the user can get locked out of the site. When this happens, trying to load any of your pages – admin, blog, login, etc. – gets you the nothing but the WordPress maintenance page:
Briefly unavailable for scheduled maintenance. Check back in a minute.
Very frustrating, and very difficult to fix things when you can’t log in to Admin. Fortunately, you don’t need Admin to fix it and get back in. Just FTP your way to the root directory and delete the .maintenance file. The name begins with a dot, so if you don’t see it using your FTP program, try logging into your server’s control panel and using the file manager to find and delete. Here is a screenshot showing the .maintenance file in the root installation directory:
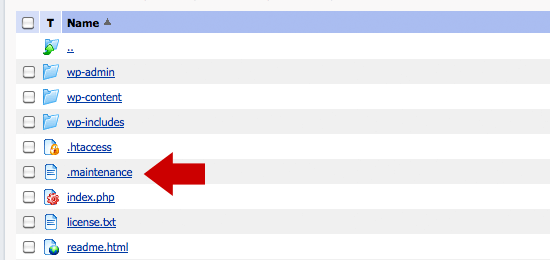
This file contains a variable that is used by the wp_maintenance function. It looks like this:
<?php $upgrading = 1302115706; ?>
If you get locked out of your site, deleting the .maintenance file will fix the issue and get you back into Admin and other areas of your site. Once there, WordPress may remind you of the recent update failure by displaying the following message:
An automated WordPress update has failed to complete – please attempt the update again now.

At this point, you have (at least) two choices: keep trying with auto-updates or download the latest version and upload manually. Even if you decide to upgrade manually, you may want to resolve the issue and get auto-updates working for future versions.
Check File Permissions
Proper file permissions are the key to smooth auto-anything. On the Codex Page for the Dashboard Updates SubPanel, the Troubleshooting section advises:
Make sure that your entire wordpress directory is owned by the username under which your Apache server runs. For example, if your server runs as https, and your files live in /var/wordpress do a “chown -R apache.apache /var/wordpress.”
In addition to this advice, you may also try changing the permissions of your /upgrade/ directory. As seen in the following screenshot, WordPress uses the /upgrade/ directory for a temporary file used during the installation process:
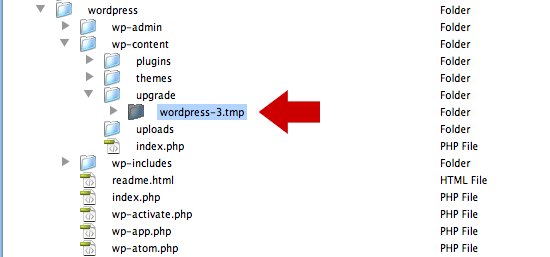
For the temporary WordPress file to be created, the /upgrade/ directory needs to be writable by the server. To see if this is the issue, try setting the directory permissions to 777 (or CHMOD equivalent) and trying the auto-update again. If it works, you’ve resolved the issue, but you should always use the most restrictive permissions possible.
This may take some research, experimenting, and/or a Help ticket with your host, but once you get it, you’re all set for auto-updates. Here is an Online CHMOD Calculator to help with the conversion process.
Turn Off Safe Mode
If possible, disabling Safe Mode may help to get auto-updates working again. According to the PHP Manual, Safe Mode is deprecated as of PHP version 5.3.0:
This feature has been DEPRECATED as of PHP 5.3.0. Relying on this feature is highly discouraged.
Disabling Safe Mode is done in a variety of ways. If disabling through your server’s control panel isn’t possible, you can use this snippet in php.ini:
safe_mode = OffOr this snippet in your Apache configuration file:
<Directory /var/www/public>
 php_admin_flag safe_mode off
</Directory>
Just add that code to your httpd.conf file and restart Apache.
Define FTP Variables in wp-config.php
As discussed, another way to get auto-updates working is to define the requisite variables in your wp-config.php file. There are numerous variations on this technique, so you’ll need to do your own experimentation to get a set of definitions that work for your situation. Here is what works for me on Media Temple’s (dv) server:
define('FS_CHMOD_FILE', 0755);
define('FS_CHMOD_DIR', 0755);
define('FS_METHOD', 'ftpext');
define('FTP_BASE', '/httpdocs/');
define('FTP_CONTENT_DIR', '/httpdocs/wp-content/');
define('FTP_PLUGIN_DIR ', '/httpdocs/wp-content/plugins/');
define('FTP_USER', 'username');
define('FTP_PASS', 'password');
define('FTP_HOST', '123.456.789');
define('FTP_SSL', false);
Place that in your wp-config.php file, just above the line that says, “That’s all, stop editing! Happy blogging.” Don’t forget to edit the username, password, and any other variables with your own information.
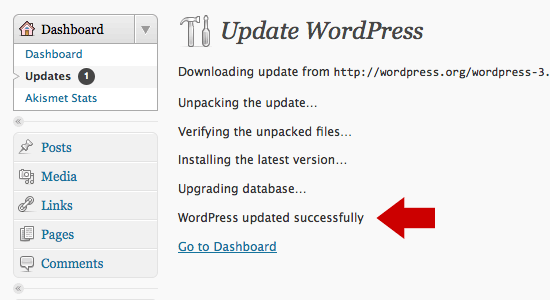
If you’re asking yourself why bother with all of this information, it’s because WordPress auto-updates features is SO awesome that it’s worth resolving any issues to get it working. Together with automatic plugin and theme updates, auto-WordPress updates have saved us many hours of work. For some sites, auto-updates works perfectly, for others, not so much. Just remember what you’re playing for here – it looks like this and will make keeping up with WordPress updates a much more enjoyable experience.
14 responses
-
How do I get rid of the “An automated WordPress update has failed to complete – please attempt the update again now.” message?
-
I just deleted the .maintenance file and the message disappeared. Thanks for giving me the heads-up about that file. I had no idea it even existed.
-
-
Hi,
Another reason why auto-update can fail is simply server script timeout.
Depending on the web host’s configuration and bandwidth (and especially on shared hosts), the whole process of downloading-unzipping-installing can be interrupted at any time, leaving the site in the same kind of state that you mention in this article.
You then have to manually fix things via FTP, by deleting the .maintenance file, cleaning the upgrade folder from temporary files, and finally finishing the update manually…
I don’t know whether the different steps (downloading, unzipping, installing) could be done in different page-requests (auto-redirect or iframes) so that each single step has a smaller probability of reaching timeout than the whole process ?
Not sure how all this can be improved, but the auto-update feature is so great (when it does work) that it’s frustrating to do without it on some hosts… :-)
-
Hi,
I started to have every update failed some time ago.
Then I started to manually deactivate all plug-ins before auto-update. It works fine for me.
All my WP installations are on shared hostings. I have set memory_limit to 512M and max_execution_time to 300, but it seems that it might be not enough. And, as you know, plug-ins are big resource consumers (and a lot of plug-ins are written with less performance in mind).
-
I was having Max Execution Time errors on my development blog too. Setting the limit to zero fixed the problem. For other readers, read a short blog entry I wrote about it here.
I don’t think I’ve had any errors with auto update on my live site. There are a couple small changes I make on the core files after each update though.
-
-
On a side note, the
.maintenancefile will automatically expire after 10 minutes. -
usually i update the wp version inside Fantastico on cPanel
i think that’s more safer & faster because the file transfer is on the same server ^^ -
yes,,, the .maintenance file will automatically expire after 10 minutes.
-
Except when it doesn’t. In my case it sat there for months generating the stupid “An automated WordPress update has failed to complete – please attempt the update again now.” message.
-
-
I had no problem before in auto updating WP. I finally notice that it would cause a problem when the WP3.1 file size is larger than 2M. Just like you can’t upload a 2M size file from WP. To increase the 2M limit, you may need to contact hosting company.
-
Fantastic post outlining and also going all the way taking into consideration critical scenarios when auto-update fails. This had just happened to my site and needless to say that this post has been extremely valuable for me to troubleshoot and get back wp backend going.
-
Luv your pdf!!! I am new to wp and my question has to do with a specific error:
Could not create directory. /public_html
I’ve checked all my permissions and made necessary changes, however, I am still getting this error message. What am I doing wrong and how can I fix this?
-
Thank you very much! The last tip (Define FTP Variables in wp-config.php) worked for me, after days trying all kind of tricks.
