Add Shortcut Links to the WordPress Toolbar
WordPress makes it easy to add custom stuff to the Toolbar. This is a great way to personalize the look and feel of the WP Admin with custom menus, links, or whatever makes sense. To further streamline workflow, you can create keyboard-shortcuts to open your Toolbar links with a single keystroke.
For example, the DigWP Toolbar contains a shortcut-link to our Gmail account, which is then linked back to the Admin area from the Google Toolbar. This helps minimize the number of open tabs and save time while working with related sites. In this tutorial, you’ll learn how to add links to the WordPress Toolbar and then take it further with optional accesskey shortcuts and integration with the Google toolbar.
Adding a link to the WP Toolbar
As with many things, WordPress makes it easy to customize the Toolbar. To add or customize links, menus, and groups, we use the add_node() function to modify the $wp_admin_bar global-object. Here is the basic usage of add_node():
<?php $wp_admin_bar->add_node( $args ); ?>Passing an array of arguments, add_node() adds a “node” to the WP Toolbar based on the specified criteria. As explained in the WordPress Codex:
Toolbar items are also called “nodes”. Nodes can be parents for other nodes, which creates dropdown menus. Group nodes together with add_group() to create distinct sections in a Toolbar menu.
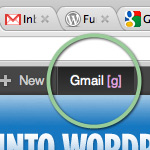
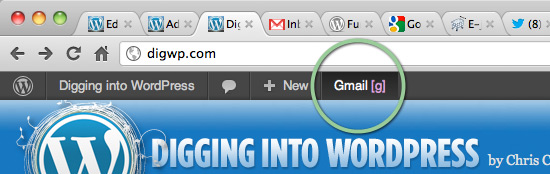
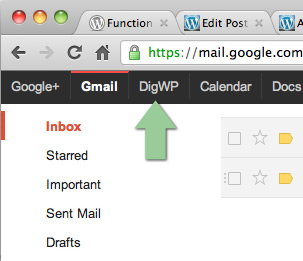
In this case, the item we’re adding is a link to an external page, which will be our Gmail inbox for this tutorial. One reason why we’re using Gmail as an example is that you can link back to your site from the Google Toolbar, which we’ll get to in a bit. For now, here is a screenshot showing the Gmail link added to the WordPress Toolbar:
Adding our link to the Toolbar requires the following code in a plugin or your theme’s functions.php file:
// add a link to the WP Toolbar
function custom_toolbar_link($wp_admin_bar) {
	$args = array(
		'id' => 'gmail',
		'title' => 'Gmail',
		'href' => 'https://mail.google.com/mail/#inbox',
		'meta' => array(
			'class' => 'gmail',
			'title' => 'email@example.com'
			)
	);
	$wp_admin_bar->add_node($args);
}
add_action('admin_bar_menu', 'custom_toolbar_link', 999);
Things to edit in this snippet:
'id' => 'gmail'— ID of the<li>element containing the custom link'title' => 'Gmail'— anchor-text for the custom link'href' => 'https://mail.google.com/mail/#inbox'— URL for the custom link'class' => 'gmail'— class attribute for the custom link'title' => 'email@example.com'— title attribute for the custom link
That should do the trick, but there is much more customization possible. For a list of all the available parameters and arguments, check out the add_node() page at the WP Codex.
You may also want to look at remove_node if you’re customizing the Toolbar.
Taking it further with accesskey
Having a custom link in the WP Toolbar is nice, but when located at the top of the page, you may find yourself scrolling just to reach it. By adding an accesskey attribute to the anchor element, we create a keyboard-shortcut that will open our custom link directly. You can add an accesskey attribute to any anchor element like so:
<a href="..." accesskey="g">Gmail</a>
You can use any single character for the accesskey value in theory, but in practice you’ll avoid headaches in certain browsers (*cough*) by sticking with letters of the alphabet. Once a link (or form element) has an accesskey, visitors can open it with a keyboard shortcut. For example, for Chrome/Mac, the shortcut is control+alt+accesskey. Other browsers have their own similar shortcuts, all well-documented on the Web. Here is a good overview of accesskey for more information.
Tip: If you’re using Chrome, Display Access Keys enables you to view all the accesskey shortcuts while surfing the Web. You can see an example in the previous screenshot: the extension displays the little “[g]” next to the link. Learning the accesskeys of your favorite sites can speed-up navigation. And for even more control in Chrome, check out Vimium for vim-like shortcuts and page-navigation.
Implementing accesskey with Toolbar links
Unfortunately, accesskey isn’t on the list of supported attributes for the add_node() function. So unless you want to fiddle with a custom-walker, jQuery is probably the easiest way of doing it:
'html' => '<script>$j(document).ready(function(){$j(".gmail a").attr("accesskey","g");});</script>',Just add that line to the custom_toolbar_link() function like so:
// add a link to the WP Toolbar
function custom_toolbar_link($wp_admin_bar) {
	$args = array(
		'id' => 'gmail',
		'title' => 'Gmail',
		'href' => 'https://mail.google.com/mail/#inbox',
		'meta' => array(
			'html' => '<script>$j(document).ready(function(){$j(".gmail a").attr("accesskey","g");});</script>',
			'class' => 'gmail',
			'title' => 'email@example.com'
			)
	);
	$wp_admin_bar->add_node($args);
}
add_action('admin_bar_menu', 'custom_toolbar_link', 999);
That will do the job, adding the specified accesskey attribute to the custom link in the Toolbar. Here is a peek under the hood, showing how the JavaScript is inserted immediately after the link, which then includes the requisite accesskey.
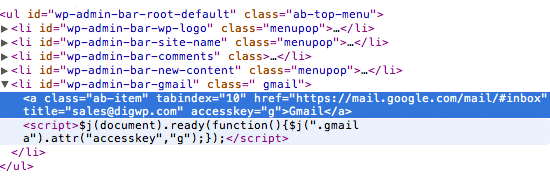
This also shows us that the content of add_node’s html parameter appears after the hyperlink. Unfortunately add_node() doesn’t include accesskey (or rel) attributes, so we’re taking the next-easiest way of getting there. Adding accesskey is easy with jQuery.
With everything in place, I press control+alt+g and I’m in Gmail. Getting back is (almost) just as easy..
Linking back from the Google Toolbar
The interesting thing about Google’s latest “black” toolbar is its similarity to the new WordPress Toolbar:

They’re not the same height though, Google’s Toolbar is 30px while WP’s Toolbar is only 28px. Even so, when working together with your WordPress site and any of your Google stuff, the consistency is nice. It took awhile to find something that worked, but eventually found the Google Custom Toolbar extension, which enables you customize the Google Toolbar. Here’s a screenshot showing GTools+ Options:
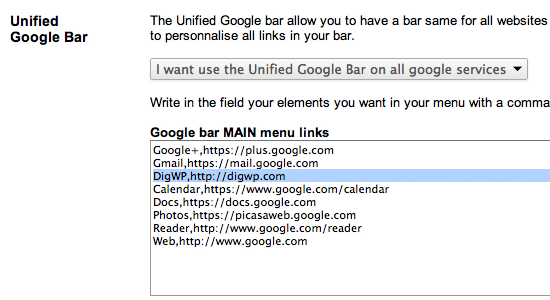
That box contains the links that appear in the Toolbar. Add or remove whatever you wish, and customize further with other settings as needed. After adding your URL to GTools+, you should see something like this:
Voilà! Navigating between Google and WordPress sites is even more seamless.. a sign of things to come? Who knows, but even without the link back to your site from the Google Toolbar, adding shortcut links to your WP Toolbar is a great way to personalize websites and streamline your workflow.
About the author
Jeff Starr is a professional web developer and book author with over 15 years of experience. Jeff works with WordPress every day, designing themes, developing plugins, and securing sites. His books include Digging Into WordPress, WordPress Themes In Depth, and The Tao of WordPress.


8 responses
-
 uxzeal
Interesting Tips :-)
-
Great stuff, thank you!
-
 Samuel
Nice little tip that adds some unique functionality to WordPress. I’ll be working on a WordPress site over the coming days and weeks so I’ll be sure to implement something similar before I complete it.
Thanks!
-
Hi there – I just purchased a PDF copy of the book (via PayPal), just wondering how I go about registering for the members log in area. Apologies if this has been mentioned elsewhere on the site, I can’t seem to find it.
Very much looking forward to reading the book and starting to get into WordPress properly :)
-
 Jeff Starr Post Author
Hi Tash,
Go ahead and contact us for any book-related issues and we’ll help you out asap.
Thank you :)
-
Thanks very much Jeff, will do! :)
-
-
-
 albinor
How to put little icon instead of title. I mean like instead of using the TITLE as “Gmail” use the Logo of Gmail in wp toolbar.
-
 David Powell
Oh, Nice! I did not know you could do this. Thanks for the tip!